In this tutorial I will show you how to make sweet Antique book charms from polymer clay. In Part 2, I will show you how to assemble it in this nice jewelry set in the photo below. Enjoy the tutorial and stay tuned for Part 2, which will be posted next week!
(Click on images to enlarge)So let's get started! :) You will need the following materials and tools:
The first stage in making anything from polymer clay is to make sure that your working surface and hands are very clean – you don't want any dust and lint getting into the clay by accident.
 The next stage is to condition the clay and mix the desired colors. For these book charms I have mixed the following colors: for the book covers - dark brown mixed with some gold clay to give it some nice mica effect, which is more visible after baking. For the 'pages' of the book I've mixed white and just a little bit of yellow to give it a slightly beige tint – the rest of the 'ageing' of the pages will be done with soft pastels later. Of course, you can use any color for the cover and pages depending on your project and inspiration.
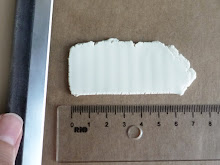
 After we've mixed the desired colors and conditioned the clay, we roll it out with our pasta machine/acrylic roller. The sheet of brown clay should be approx. 1 mm thick (~ setting 3 on the pasta machine), and the sheet of white clay should be approx. 2-3 mm (~thickest setting on the pasta machine).
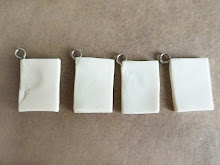
Then we will proceed with making the pages of our antique book charms. We need to decide how big we want the charms to be, and then cut the rectangles for the pages slightly smaller. I want to make 4 charms, so I've cut 4 white rectangles measuring about 2x1 cm.
Next we need to add eye pins to the charms, so that we can later attach them to jewelry. We shouldn't directly insert the pins in the clay, because polymer clay does not adhere to metal, and straight eye pins could result in our charm falling off. To prevent this, we will make the eye pin into a hook (or any other shape, as long it's not straight) – this way the pin will stay in without any glue. The hook doesn't have to be perfect, because it will not be visible on the outside.
Now we will take the sharp blade and cut the white rectangles starting from one corner to the middle, as shown in the pictures below (we don't need to cut all the way through). Then we insert the hooks between the two layers, so that the eye of the pin remains outside one of the corners. We carefully press the two layers back together, so that we don't trap any air inside. We could also use the acrylic roller to lightly roll over the rectangles, and the modelling tools to adjust the shape of the rectangle in case there had been any distortion.
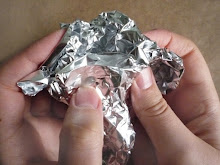
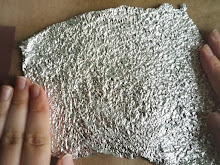
Next we are going to make the book covers. In order to give them a nice leathery texture, we will take regular kitchen tin foil and crumple it as shown in the pictures. After we've reached the desired level of crumpleness (is this a word? :D), we straighten out the foil (matte side up), place the brown sheet clay on top of it, and roll over it with the acrylic roller, so that the texture of the foil becomes imprinted on the surface of the clay sheet. And voila! We now have a fine leathery texture without expensive texture sheets :P
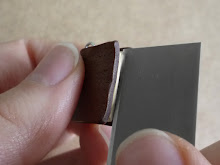
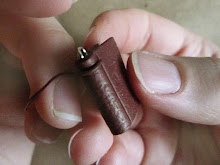
Then we flip the sheet over with the texture-side down and we position the page rectangles where we want them to be. Ideally there would be a tiny bit of space left near the edges. Then we cut the excess clay and wrap the other side of the pages as well. Remember – the eye pin should be at the inner corner of the antique book charm.
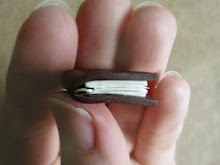
The next part (and personally the most exciting one) is to make those books REAL! We take the sharp blade and while holding the book with one hand, we make random cuts along the side of the white rectangle, so that it looks as if there are separate sheets of paper.
Then we pick a soft pastel to tone the pages, so that they look yellow and old. A good color for that will be beige or dim yellow. Using the blade, we scrape at the side of the pastel, so that we get pigment powder. Then using a paintbrush, we lightly brush this pigment powder on the pages of the book, giving them more depth and a nice antiqued look.
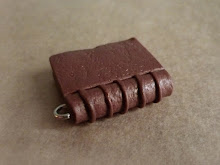
After we're done with the pages, it's time to go back to the cover of the book. Using the back of the blade, we make indents on each side of the book as shown in the pictures. Then we roll out a thin snake of the same brown clay, and we use it to make ridges on the back of the book. After we've made the ridges, we use our fingers and modelling tools to make the edges of the book cover slightly more crooked and the corners sticking out, so that the book looks used.
And then we're done :)! We bake the charms at the correct temperature according to manufacturer's instructions depending on the brand of clay for at least 20-30 minutes.
I hope you found this tutorial helpful and inspiring! Stay tuned for next week's Part 2 – how to assemble these charms into this wonderful jewelry set.
Edit: You can now purchase similar Antique book jewelry in my Etsy shop :P
Edit: You can now purchase similar Antique book jewelry in my Etsy shop :P
Stay sunny!
Sevda (WindySundet)
 Welcome to











No comments:
Post a Comment