Spring is in the air, and I totally feel nature inspired, so in this tutorial, I will teach you how to make your own gem tree – it’s easy!
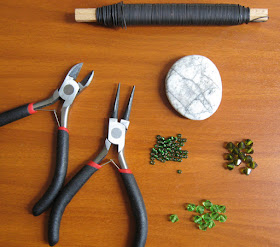
(Click on images to enlarge)We will need the following materials and tools:
We will use the pebble as a base for our gem tree. To get a clearer idea of the size of the pebble, its dimensions are 5x4cm, but you can really use any size you would like. You can either use a river pebble, or a decorative pebble such as the ones sold in stores.
Next, we take the wire, and with the cutter pliers we cut 5 pieces with approximately 20cm length each. I’m not sure what gauge is this wire, but generally we need a thicker wire which is neither too soft, nor too hard. If the wire is too soft, the gem tree will be unstable and easily damaged, and if it’s too hard, the wire will be difficult to work with.
If your wire is smoother than mine, you may want to make it look ‘rougher’. You can do that by twisting it with your fingers in different directions and then straightening it out (but not entirely) until you achieve a rough and distorted look.
Then we take the wire pieces and make them L-shaped (let the short part be about 5-6cm – the ‘roots’). We will take two pieces of wire, hold them at the L-bend and twist them around one another (as shown in the image). The twisted part should be about 6cm, and this will be the stem of our gem tree. Then we take the other wire pieces and one by one we twist them around the stem (don’t forget to leave wire for roots!).
Now that we are done with the stem of our gem tree, we will focus on attaching the tree to the pebble (ignore the tree branches for now, we will tackle them in a bit).
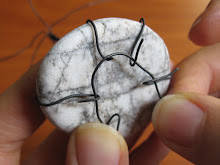
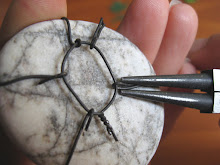
First we position the tree where we want it to be (e.g the center of the pebble). Then by holding it with one hand, we turn the pebble and the tree around and start wrapping the ‘roots’ around the pebble. While still holding the stem so it doesn’t shift, we twist the wire with the round nose pliers as shown in the image.
First we position the tree where we want it to be (e.g the center of the pebble). Then by holding it with one hand, we turn the pebble and the tree around and start wrapping the ‘roots’ around the pebble. While still holding the stem so it doesn’t shift, we twist the wire with the round nose pliers as shown in the image.
Then we cut a piece of wire, approximately 4-5cm. We put the wire though all the ‘loops’ we’ve created with the pliers. Next we join the two ends of that piece (make sure you haven’t left any loose roots) and twist them together with the round nose pliers to tighten the roots’ grip around the pebble. Then we press the root loops with the pliers, so that they don’t stick out. You can cut any excess ends with the cutter pliers. If your pebble has an uneven bottom, you can “stabilize” it by pressing the loops more or less, depending on the varying thickness of the pebble, so that eventually your pebble is in a perfect horizontal position.
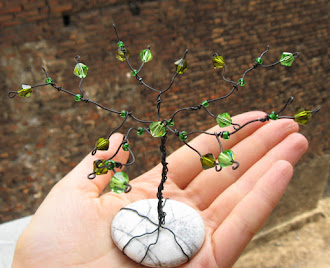
Once we’ve attached our future gem tree successfully to the pebble, we can turn back the pebble and adjust the upper part of the roots. With the tip of the round nose pliers we can twist the root wires at several places to create a more natural feeling. In the end the roots should look something like in the second image.
Now we return to the branches of the tree. You can cut the branches shorter if you would like, but it depends on what size and shape of tree you have in mind. Now we will need to cut about 15 wire pieces of approximately 4cm length (for the smaller branches). The number of those depends on how many branches we will want to add to the 5 bigger ones we’ve already got.
Then we take each wire piece and we twist the end, so that we have a loop as shown in the image. We do this to prevent the beads/gems from falling off the tree. It also gives a swirly look to the tree.
After we’ve twisted the ends, we string the bead on the wire and then slightly push the part after the bead (as shown in the image), so that the bead stays at the top of the branch (hint: this would not work with smaller beads). The beads will be our gem tree’s ‘leaves’.
Then we take the wire to the branch which we want to attach it to, and push the wire with fingers to create a small loop (be sure to leave about 0,5-1cm for wrapping around). While holding the end with the bead in one hand, we pull the other end (the short end) with the round nose pliers to secure the two wires together. After that you continue wrapping around the rest of the wire around the big branch until the small branch is completely fixed and immobile (you can cut off the excess wire, if any).
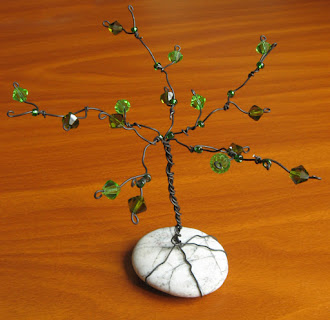
Then we basically continue the same procedure until we’ve attached as many small branches with ‘leaves’ as we like. In the making of this tree I’ve put 3 beads per big branch (alternating the two shades of green glass beads I have), and after each small branch, I’ve strung a green seed bead onto the ‘big’ branch. In the end I twisted the big branch ends into a loop as I did with the small branches, because I really do like that swirly effect :P
Then we basically continue the same procedure until we’ve attached as many small branches with ‘leaves’ as we like. In the making of this tree I’ve put 3 beads per big branch (alternating the two shades of green glass beads I have), and after each small branch, I’ve strung a green seed bead onto the ‘big’ branch. In the end I twisted the big branch ends into a loop as I did with the small branches, because I really do like that swirly effect :P
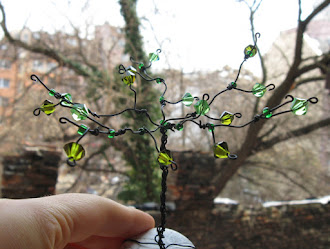
After we’ve finished attaching the branches, we shape the branches of the tree as we like, giving the tree the final touch.
You can also create numerous variations of the gem tree – you can e.g use red, orange or yellow beads to create an autumn tree; you can use green and pink beads to create a tree in blossom, or green and red to create perhaps an apple tree. You can also use white and blue beads, and although I’m not sure what that would be, it would look awesome :). You can make the tree with more than 5 branches to create a thicker crown, a different shape. In short, you can make anything you imagine :P
Thanks for reading!
Greetings,
Sevda (WindySunset)
Thanks for reading!
Greetings,
Sevda (WindySunset)
 Welcome to






Awesome! Thank you for sharing this!
ReplyDeleteYou are welcome :)
DeleteAbsolutely brilliant. Can't wait to have a go. If I make a good example, maybe make some for presents. Thank you for sharing.
DeleteThanks! You're welcome :)
DeleteVery Good
DeleteMy grandfather made trees like this with his computer wires (1950's?). One of them was a gumdrop tree. He left off the precious stones and would stick gumdrops on the ends of the branches.
ReplyDeleteHi, great picture tutorial, very clear. I also make wire trees but I use seed beads as I've posted here :
ReplyDeletehttp://katthecraft.blogspot.com/2015/02/how-to-make-beaded-wire-tree.html
It's the base that I'm still figuring out what best to make, your technique on making sure the roots stay in place definitely does the trick. I'll surely try this. Right now I use a little dish with pebbles, a tedious work glueing each pebble so they stay in place. Thanks for the inspiration, simple and beautiful.
Thank you for sharing the link! I'd love to try out your wire tree, looks very nice and ornate :)
DeleteI'm also very glad that you enjoyed my tutorial and found it inspiring :)
I am making individual fairy gardens for some little girls and this is the perfect item to design them around. Thanks so much for a great tutorial.
ReplyDeleteI'm so glad you found it useful! :)
DeleteYour idea and instructions are great!!! I will do this with my grand daughters when they come on vacation to "Grammie Camp" this summer
ReplyDeleteThank you! I hope you all enjoy it very much :)
DeleteVery nice tutorial... you might want to reload your pictures to another photo-hosting site, since Photobucket doesn't allow you to repost them to another site for free anymore.
ReplyDeleteI am aware, but I'm still working on restoring my images. Sorry! Come back in a few days and everything will be good as new :)
DeleteAbsolutely awesome! Best instructions I've found yet on how to make one! Your pictures are exactly what your describing, which is so helpful! Can't wait to make one!
ReplyDeleteThank you! Have fun making it :)
DeleteVery good instructions. I made two today.
ReplyDeletevery cool- I'm going to try to make willow trees so I'll need to extend the length of the wire but they're gonna look so cool when they're done
ReplyDeleteI L.O.V.E. it........too bad I got tired of beading and gave over $400 worth of beads away to a friend....ho hum
ReplyDelete