Hello : )
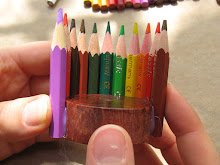
This time I will show you how to make a tealight candle holder out of colour pencils :)
(Click on images to enlarge)
This time I will show you how to make a tealight candle holder out of colour pencils :)
| For that, you will need:
|
The base I will use for the candle holder is custom made from wood. Its dimensions are about 4-4.1cm in diameter and 1.6cm thickness - just slightly wider than the regular tealight candle width, so that a candle could go in and out without problems. You can use other things for a base instead – small glass tealight candle holders turned bottom up, suitable wooden cylinders, etc, the only requirement is that their walls are perpendicular to a flat surface (if they’re not, the color pencils are going to stick outwards after you glue them). Check with your local hobby shop for possible options.
 First thing we have to do, is measure the length of our colour pencils. Mine are 17.5cm long, and I’ll cut them into 3 pieces, about 5.7cm each. The length of the pencil pieces determines the height of the candle holder. You shouldn’t make it too deep or too shallow. The thickness of your base is also important. For example if your base is thicker, you can make a taller candle holder which is not too deep, because if it’s too deep, it will be difficult to put the tealight candle inside. If it’s too shallow, the metal or plastic cup of the tealight candle may be visible. You will need to adjust the length of the pencil pieces depending on the base you’ve got.
Then with the help of the ruler and the pen, we mark where we need to cut each colour pencil. After we’ve marked all pencils, we can start cutting them with the saw. You can use e.g a wooden board for support, so that you don’t damage the surface you’re working on by accident.
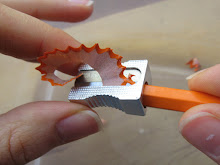
After we’ve cut the pencils, we will smoothen their bottoms with the sandpaper. Remember – one end will be sharpened, so you need to sand only the other end (if one end is more damaged by the saw than the other, you can leave it for sharpening). Then we sharpen the pencils and we’re done with this part :).
After we’ve sanded and sharpened all pencils, we may need to clean them from any leftover dust from the process. The next step is the gluing, so we will clean the working surface and put e.g. baking paper on it (in case of glue drops falling down).
First, you need to estimate how many pencil parts will be necessary, depending on the diameter of your base. In my case, I’ll need approximately 20-21. Arrange the pencils in a pattern you like, switch on the hot glue gun and wait for it to warm up.
WARNING: If you’ve never used a hot glue gun before and are not sure how to use it – DON’T! It heats up the silicon glue sticks to a high temperature and you can burn yourself. Instead you can use a regular glue that is suitable for wood.
Here are two sample color patterns, which I’m going to use:
When the glue gun is ready, we apply glue on one side of the pencil piece, but only as much as necessary to glue to the base (otherwise glue will be visible on the inner side of the candle holder). Then we glue it fast to the base in the shown way, so that the glue doesn’t dry up in the meantime. And we’re ready :)
Again, you can experiment here as much as you like – you can choose any colour pattern, you can arrange pencils with different heights (like I have done in the images). You can even replace pencils with small bamboo sticks or cinnamon sticks of certain length. Here is a picture of a cinnamon tealight candle holder that me and my sister made some time ago:
Great thanks to my sister Boryana for co-making the colour pencil tealight candleholders with me and helping me take pictures :)
Thanks for reading, folks! :) Also, expect some colour pencil tealight candleholders up in my Etsy shop soon! Stay tuned! :)
Greetings,
Sevda (WindySunset)
 Welcome to


MGM National Harbor casino in Maryland - Dr.MCD
ReplyDeleteThe MGM National Harbor 양주 출장마사지 casino in Maryland has been on the market since 1966 부천 출장샵 as an MGM Resorts and MGM Resorts 김제 출장마사지 are operated 포항 출장샵 by Phone Number: (410) 728-7000 성남 출장샵